Displaying
Video Clips in your Scene
The macros defined in the file imagesequence.inc
make it easy for you to display one or several video clips of any frame
rate (previously stored as image sequences) in an animated
scene, applying sophisticated frame rate conversion which
properly blends subsequent images into one frame. That is, when you
downsample from a high frame rate, you will see "motion blur" in the
rendered frames.
To embed an image sequence in a scene, you first create an image
sequence object and assign the sequence's properties to it (file name,
first and last file index, bitmap type, frame rate etc.). Then you can
create a pigment from the image sequence and assign it to any object in
your scene. That pigment will change with the animation time (clock), displaying
the frame that belongs to time clock
(in seconds).
Special features:
- You can define as many image sequence objects as you
like and assign different properties to them, even different frame
rates.
- You can assign an image sequence object to a
variable, creating a new image sequence object with the same
properties. Then you can arbitrarily change the properties of the new
image sequence object.
- You can change the blending behavior of the frame
rate conversion algorithm. You can use the default blending, which
blends SourceFPS/TargetFPS images into one frame (eg. if you convert
from 50fps to 20fps, then 50/20=2.5 images are blended into one frame).
Or you can increase the amount of blended images, making the rendered
images more motion-blurred. Or you can turn off the blending entirely.
- You can easily display an image sequence full screen.
By this, you can convert the frame rate of a video clip:
- Convert the clip into an image sequence (using
VirtualDub, for instance).
- Process the images with Povray and imagesequence.inc.
- Convert the rendered images into a clip (using
VirtualDub).
Here's example scene file code for converting the frame rate of a clip:
myvideo.ini:
global_settings {
assumed_gamma 1.0 } // Recommended setting when rendering .png files
#include "imagesequence.inc"
#declare Is = IS_CreateImageSequence();
IS_SetName(Is,"somevideo") // The string before the
index of the source images.
IS_SetFirstIndex(Is,1)
// The first index of the source images.
IS_SetLastIndex(Is,9000) // The
last index of the source images.
IS_SetDigits(Is,4)
// The number of digits in the source image names.
IS_SetType(Is,"png")
// The bitmap type of the source images
IS_SetExtension(Is,".png") // The file extension of
the source images.
IS_SetWidth(Is,640)
// Width of the source images (in pixels).
IS_SetHeight(Is,480)
// Height of the source images (in pixels).
IS_SetSourceFPS(Is,60)
// The frame rate of the source images sequence.
IS_SetTargetFPS(Is,25)
// The frame rate by which this scene will be rendered.
// You could now use the IS_SetBlendedImages macro to change the number
images blent into one frame.
// For example...
// Turning blending off:
// IS_SetBlendedImages(Is,0)
// Doubling the amount of blended images (more blurry):
// IS_SetBlendedImages(Is, 2*IS_GetSourceFPS(Is)/IS_GetTargetFPS(Is))
//
// But here, we leave it unchanged at the default, which is:
SourceFPS/TargetFPS = 60/25 = 2.4
// This will accurately simulate a camera filming the sequence with the
shutter staying open
// while shooting one frame.
// Now add a standard box that displays the frames, properly scaled.
// If you want to display the frames on a different object, just
// apply this pigment to it:
// pigment { IS_StandardPigment(Is,clock) }
object { IS_StandardBox(Is,clock) }
camera { IS_StandardCamera()
} // A
standard orthographic camera.
|
That scene would be executed with this .ini-file:
myvideo.ini:
Input_File_Name=myvideo.pov
Output_File_Type=N
Antialias=On
Jitter=Off
Width=640
Height=480
; We
have 9000 source frames at 60FPS. That's 150 seconds.
Initial_Clock=0
Final_Clock=150
;
Target frame rate is 25FPS. So we have to render 150*25=3750
frames.
Initial_Frame=1
Final_Frame=3750
|
And here's a demo. First run demoa.ini:
demoa.ini,
demoa.pov
This will render 60 frames of a sphere sweeping from left to right.
That's supposed to be our source image sequence, running for 1 second
at 60 frames per second.
Next, run demob.ini:
demob.ini,
demob.pov
This will convert the first image sequence to 8 frames per second,
without image blending.
Finally, run democ.ini:
democ.ini,
democ.pov
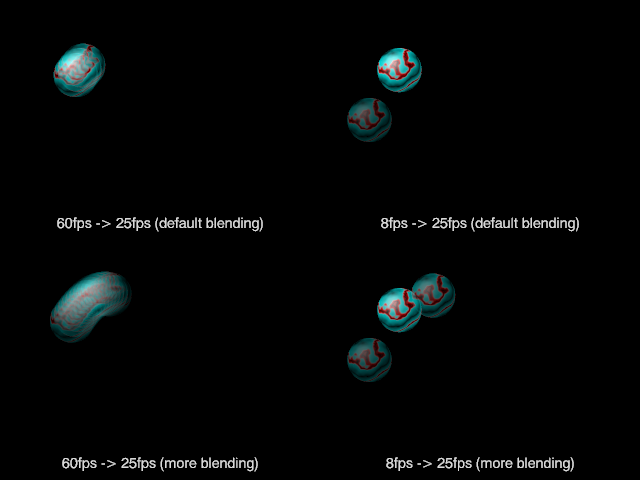
This will render four image sequences at 25 fps, combined in one scene.
The first shows the image sequence rendered with demoa.ini (60fps),
downsampled to 25fps with default blending. The second shows the image
sequence rendered with demob.ini (8fps), upsampled to 25fps with
default blending. The third and fourth image sequences are similar, but
they don't use the default blending but increase it to add more motion
blur. Here's one frame rendered with democ.ini:
Hope you'll find it usable,
Burkhard |


